
An HTML file is simply a text file saved with an .html or .htm extension.
Getting Started
In this tutorial you will learn how easy it is to create an HTML document or a web page. To begin coding HTML, you need only two stuffs: a simple-text editor and a web browser.
Well, let's get started with creating your first HTML page.
Creating Your First HTML Document
Let's walk through the following steps. At the end of this tutorial, you will have made an HTML file that displays "Hello world" message in your web browser.
Step 1: Creating the HTML file
Open up your computer's plain text editor and create a new file.
Tip: We suggest you use Notepad (on Windows), TextEdit (on Mac) or some other simple text editor to do this; don't use Word or WordPad! Once you understand the basic principles, you may switch to more advanced tools such as Adobe Dreamweaver.
Step 2: Type some HTML code
Start with an empty window and type the following code:
Example
<!DOCTYPE html>
<html lang="en">
<head>
    <title>A simple HTML document</title>
</head>
<body>
    <p>Hello World!<p>
</body>
</html>
Step 3: Saving the file
Now save the file on your desktop as "myfirstpage.html ".
Note: It is important that the extension .html is specified — some text editors, such as Notepad, will automatically save it as .txt otherwise.
To open the file in a browser. Navigate to your file then double click on it. It will open in your default Web browser. If it does not, open your browser and drag the file to it.
Explanation of code
You might think what that code was all about. Well, let's find out.
- The first line
<!DOCTYPE html>is the document type declaration. It instructs the web browser that this document is an HTML5 document. It is case-insensitive. - The
<head>element is a container for the tags that provides information about the document, for example,<title>tag defines the title of the document. - The
<body>element contains the document's actual content (paragraphs, links, images, tables, and so on) that is rendered in the web browser and displayed to the user.
You will learn about the different HTML elements in detail in the upcoming chapters. For now, just focus on the basic structure of the HTML document.
Note: A DOCTYPE declaration appears at the top of a web page before all other elements; however, the doctype declaration itself is not an HTML tag. Every HTML document requires a document type declaration to ensure that your pages are displayed correctly.
Tip: The <html>, <head>, and <body> tags make up the basic skeleton of every web page. Content inside the <head> and </head> are invisible to users with one exception: the text between <title> and </title> tags which appears as the title on a browser tab.
HTML Tags and Elements
HTML is written in the form of HTML elements consisting of markup tags. These markup tags are the fundamental characteristic of HTML. Every markup tag is composed of a keyword, surrounded by angle brackets, such as <html>, <head>, <body>, <title>, <p>, and so on.
HTML tags normally come in pairs like <html> and </html>. The first tag in a pair is often called the opening tag (or start tag), and the second tag is called the closing tag (or end tag).
An opening tag and a closing tag are identical, except a slash (/) after the opening angle bracket of the closing tag, to tell the browser that the command has been completed.
In between the start and end tags you can place appropriate contents. For example, a paragraph, which is represented by the p element, would be written as:
Example
<p>This is a paragraph.</p>
<!-- Paragraph with nested element -->
<p>
    This is <b>another</b> paragraph.
</p>
You will learn about the various HTML elements in upcoming chapter.
HTML Elements
In this tutorial you will learn about HTML tags and elements.
HTML Element Syntax
An HTML element is an individual component of an HTML document. It represents semantics, or meaning. For example, the title element represents the title of the document.
Most HTML elements are written with a start tag (or opening tag) and an end tag (or closing tag), with content in between. Elements can also contain attributes that defines its additional properties. For example, a paragraph, which is represented by the p element, would be written as:
We will learn about the HTML attributes in the next chapter.
Note: All elements don't require the end tag or closing tag to be present. These are referred as empty elements, self-closing elements or void elements.
HTML Tags Vs Elements
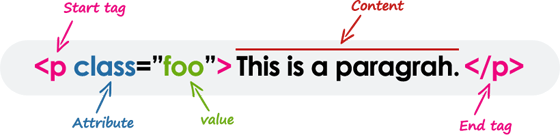
Technically, an HTML element is the collection of start tag, its attributes, an end tag and everything in between. On the other hand an HTML tag (either opening or closing) is used to mark the start or end of an element, as you can see in the above illustration.
However, in common usage the terms HTML element and HTML tag are interchangeable i.e. a tag is an element is a tag. For simplicity's sake of this website, the terms "tag" and "element" are used to mean the same thing — as it will define something on your web page.
Case Insensitivity in HTML Tags and Attributes
In HTML, tag and attribute names are not case-sensitive (but most attribute values are case-sensitive). It means the tag <P>, and the tag <p> defines the same thing in HTML which is a paragraph.
But in XHTML they are case-sensitive and the tag <P> is different from the tag <p>.
Example
<p>This is a paragraph.</p>
<P>This is also a valid paragraph.</P>
Tip: We recommend using lowercase for tag and attributing names in HTML, since by doing this you can make your document more compliant for future upgrades.
Empty HTML Elements
Empty elements (also called self-closing or void elements) are not container tags — that means, you can not write <hr>some content</hr> or <br>some content</br>.
A typical example of an empty element, is the <br> element, which represents a line break. Some other common empty elements are <img>, <input>, <link>, <meta>, <hr>, etc.
Example
<p>This paragraph contains <br> a line break.</p>
<img src="images/sky.jpg" alt="Cloudy Sky">
<input type="text" name="username">
Note: In HTML, a self-closing element is written simply as <br>. In XHTML, a self-closing element requires a space and a trailing slash, such as <br />.
Nesting HTML Elements
Most HTML elements can contain any number of further elements (except empty elements), which are, in turn, made up of tags, attributes, and content or other elements.
The following example shows some elements nested inside the <p> element.
Example
<p>Here is some <b>bold</b> text.</p>
<p>Here is some <em>emphasized</em> text.</p>
<p>Here is some <mark>highlighted</mark> text.</p>
Tip: Placing one element inside another is called nesting. A nested element, also called a child element, can be a parent element too if other elements are nested within it.
HTML tags should be nested in correct order. They must be closed in the inverse order of how they are defined, that means the last tag opened must be closed first.
Example
<p><strong>These tags are nested properly.</strong></p>
<p><strong>These tags are not nested properly.</p></strong>
Writing Comments in HTML
Comments are usually added with the purpose of making the source code easier to understand. It may help other developer (or you in the future when you edit the source code) to understand what you were trying to do with the HTML. Comments are not displayed in the browser.
An HTML comment begins with <!--, and ends with -->, as shown in the example below:
Example
<!-- This is an HTML comment -->
<!-- This is a multi-line HTML comment
     that spans across more than one line -->
<p>This is a normal piece of text.</p>
You can also comment out part of your HTML code for debugging purpose, as shown here:
Example
<!-- Hiding this image for testing
<img src="images/smiley.png" alt="Smiley">
-->
HTML Elements Types
Elements can be placed in two distinct groups: block level and inline level elements. The former make up the document's structure, while the latter dress up the contents of a block.
Also, a block element occupies 100% of the available width and it is rendered with a line break before and after. Whereas, an inline element will take up only as much space as it needs.
The most commonly used block-level elements are <div>, <p>, <h1> through <h6>, <form>, <ol>, <ul>, <li>, and so on. Whereas, the commonly used inline-level elements are <img>, <a>, <span>, <strong>, <b>, <em>, <i>, <code>, <input>, <button>, etc.
You will learn about these elements in detail in upcoming chapters.
Note: The block-level elements should not be placed within inline-level elements. For example, the <p> element should not be placed inside the <b> element.
